NEON MINI AUTO

Welcome to our FAQ area for LiteHawk NEON MINI AUTO. Tips and tricks, along with step by step User Guides are right here. Check our Overview video for even more info!
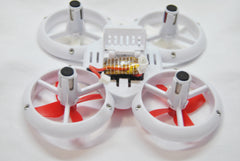
      

LiteHawk MINI NEON — Micro LED Drone

NEON MINI AUTO is simply remarkable! Small, compact and bristling with all the latest features. Its unique two-piece design houses all the advanced electronic, mechanical and LED lighting systems in a sturdy structure. Even the rotor blades are protected! The LED's are enclosed in the rotor guards so NEON looks like nothing else available - the lights are very, very bright allowing you to easily see NEON day or night!

LED lights are white in the front and red at the rear, so it's easy to tell direction when you are flying!

Advanced "Low Battery" warning system protects your on-board battery!

Features:

  • AUTO feature allows for AUTO Take-Off, AUTO Altitude Hold and AUTO Landing! All at the touch of a button!

  • The 2.4Ghz 4 Channel radio lets you fly without the fear of losing signal. Not to mention there are no set channels, so you can fly multiple quads with your friends at the same time!

  • Fully Digital Stabilization

  • Adjustable flight modes with Auto Flip feature

  • Factory Assembled & Ready to Fly

  • Includes rechargeable lithium battery and USB charger

  • Reusable packaging so you can easily store your toy and keep all the accessories together!

  • Protective Rotor Guards

  • Complete line of Replacement Components

  • Step-by-step User Guides

  • 2 x AA batteries required for the controller

 Accessing The MINI NEON'S Battery:

  • Open the Battery Hatch Door on the bottom of the NEON MINI AUTO by pressing down on the Grip Tab that holds it closed. The Door will swing open on its hinges. 


  •  With the Battery Hatch Door open, you can now begin to remove the battery. Take careful note, of how the wiring is folded into place to be able to close the battery door when reinstalling the battery. It has to be snug so that the battery won't shift in flight. 


  • Carefully unplug the battery from the drone, don't pull on the wires, pull on the connectors, and they will separate without breaking any wires. 


  • Remove the battery from the drone for charging.


  • When reinstalling the battery, make sure that the start switch is turned off until you need it.


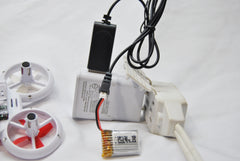
How to Charge The LiteHawk MINI NEON:

Your LiteHawk NEON MINI AUTO comes with a Li-Po battery which is inside the model. You should expect a 5-8 minute run time. However you do need to make sure to properly maintain your Li-Po Battery. 

  • Li-Po batteries don't like to be run down too low. If the voltage is dropped below 3.6V they may be damaged and not recharge! Once the model starts to slow down (the lights will also begin to blink on the NEON MINI AUTO), fly your model to a safe place, walk over and turn it off. 
  • It is recommended to charge the battery before your first flight and after all other flights and to always store your battery with a charge. Never discharge or dead short a Li-po battery! Always have your model turned off and the battery unplugged when not in use.
  • Plug the USB into your computer, TV,  Surge Protector, or USB wall adapter (not included) to charge NEON MINI. Don't use a USB power source with a higher output than 5V 2A (2000mA). Just insert the included USB charging plug into the USB port. The USB plug will light up red, which indicates power to the charger.


    • Plug the battery into the other end of the cable.. it only fits one way.. and the red light on the charger will go out.. which indicates that the charger has started to charge the battery.


    • Charging times vary but can be as high as 60 minutes depending on the state of the battery's charge and output of the charging power source.
    •  When it's done charging, the light will come back on. It's that easy!


    • When storing NEON for more than a day, fully charge the battery to preserve its condition and fitness.
    • Replace your battery into the drone, but don't reconnect it until you are ready to fly! 
    • Always let your battery cool down after a flight before charging it. Charging a hot Li-Po battery will damage it.
    • Fully charged, your battery should read 4.2 volts.
    • When your drone begins to slow down.. stop.. let things cool off, and recharge the battery. It should not read below 3.7 volts.. never fully deplete a Li-Po battery of its charge.

Synchronize The MINI NEON:

 How To Sync
1/ Make sure the model is turned Off and locate a flat level surface.
2/ Plug the battery into the MINI NEON and turn it on. Place the MIMI NEON on the flat surface, you must do this within 5 seconds of turning the power switch ON. You will see flashing lights on the MINI NEON start to blink.


3/ Turn on the power for the controller. You will see a flashing red LED light and audible beep indicating the power is on. Both the Controllers light and  the Drones lights will be blinking.


4/ Move the left control stick (this is also the throttle stick) all the way up, then all the way down. You will hear an audible beep at the top and again at the bottom. The controllers light and the drones lights should now be solid. The model is now bound, and ready for flight!


The MINI NEON MUST be on a flat surface in order to digitally self level itself, otherwise the model will not sync to the controller.


Auto Take Off - Press the Auto Take Off Button to start the motors on your Drone, after the binding process. Now push up gently on the Throttle stick, release the throttle stick at your desired altitude. The Auto take off button, is the Left control stick. It not only functions with forward, reward, and left, right motions of the stick, but also functions as a button, that presses inward on the controller. 


 Auto Land- Press the Auto Land Button to slow the motors on your Drone, the drone will land itself. The Auto Land button is the Right control stick, and it too presses inward on the controller.

 Altitude Hold-Your LiteHawk Drone is equipped with a barometric sensor which allows for Altitude hold capability. The Drone will maintain your desired height while flying.   The Left Stick (Throttle) is now spring loaded and rests in the center position. If you want to climb, just push up on the throttle stick and release when you have achieved your desired height. To Lower the Drones height, just push the throttle stick down, until the desired height is achieved, then release the stick.

  LiteHawk MINI NEON - Post Flight 
- When you have finished using your LiteHawk NEON you should first disconnect the Li-Po battery, then switch OFF the transmitter.
- If you do not plan on using the drone for more than 24 hours, it is recommended that you recharge the battery fully before putting it away.
- Remember to allow the battery to cool 10-15 minutes before recharging.
  Standard/Sport Modes:
Press once and you will hear one beep - you are in Standard Mode (response rates are at 50%). Press again and you will hear two beeps - you are now in Sport Mode 2 (response rates are at 75%). In Sport Mode 2, controls are much more responsive. Press again and you will hear three beeps - you are now in Sport Mode 3 (response rates are at 100%). This is an advanced setting and should only be used when you are comfortable flying yourMINI NEON. Sport Mode 3 is for outdoor use. Factory setting is Standard Mode.
  MINI NEON ROTOR BLADE CARE
  • The physical design of NEON provides some impact protection to the rotor blades by surrounding each blade with a ring. While this can save a blade in most collision situations, blade damage can still occur by contact with the tip of a tree limb, or some other small body that can't be excluded by the rings. Should you break a rotor blade, it's extremely easy to replace it!
  • To remove a rotor blade, simply grasp the rotor blade with one hand (topside) and the motor pod with the other (underside) and pull the rotor blade off the motor shaft. Gentle but firm effort is all that's required.
       
    • Each rotor blade has a unique color and blade pitch. The 2 white and 2 red blades that you are given as spares are each an identical match to the ones on the Drone. Each blade is just a little bit different from each other. Either color or pitch of the blades are different, and the correct blade must go to the correct motor or it won't fly. I the picture blow, you can see the 4 blades, and how the 2 middle ones, are different colors but have the same twists or pitch to the blades. The 2 outside blades are again different colors, but again have the same twists or pitch to there blades, but the pitch of the outside blades is opposite of the ones circled in the middle. 


    • Rotor blades are stamped with an A or B designator that indicates its position. Be sure to select and install the correct rotor blade.


    • To install a rotor blade, slide it onto the motor shaft until it is fully seated. Again, gentle but firm effort is all that's required. Check the freedom of the blade by giving it a flick with your finger, if it feels too tight in comparison with the others, just pinch it back a very tiny bit and flick it again.
    • Hair and other fiber can wind itself around the motor shafts, possibly causing drag and reducing performance. To remove the wound hair or fiber, remove each rotor blade, pull off the accumulation, and replace the blade as outlined above.

     LiteHawk MINI NEON AUTO Battery Door Replacement:

     If you have lost or broken your Battery Compartment Door, it is easily replaced. Use a flat edged screw driver to very carefully compress one side of the door hinge so that the pins will fit into the hinge fixtures on the back of the Battery compartment.