MONSTER MT 4x4 FAQ

|
|
LiteHawk Monster 4X4 INDEX Sections 1 - 10
|

|
Section 2 LiteHawk MONSTER 4X4 LITHIUM Battery and Charging Instructions Your New LiteHawk comes with two rechargeable 3.7 Volt LITHIUM Batteries. These Batteries provide the power for the model. Please read the following information before using your new LiteHawk.
3. Insert the two 3.7V batteries into the cradle, observing the correct polarity, and the charging lights will become a solid RED color, indicating that they are charging. Charge times are ( 2- 2.5 Hrs. ) do not leave on charge overnight. Batteries should be taken out of the charger after a maximum of 8 hrs.
During Charging: - It is normal for the batteries to get warm during the charging process. Do not charge the Batteries on a surface that is Flammable or can be damaged by heat. -Do not leave the batteries and charger unattended while charging. -Do not store the batteries plugged into the charger. |


|
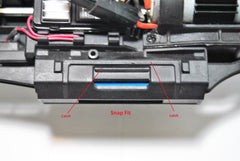
Section 3 LiteHawk MONSTER 4X4 Battery Placement Place your MONSTER 4X4 on a clean flat surface. Avoid areas where small parts may be lost. The Battery compartments are found, one on each side of the chassis, between the wheels. The battery compartment has a battery cover that easily unsnaps from the chassis. Observing polarity, place your fully charged 3.7V battery into the compartment and put the Battery cover back in place. Make sure that you feel in snap into position firmly! When both batteries are installed.. you are ready to play! |

|
Section 4 LiteHawk MONSTER 4X4 Start-up With the batteries installed, Your LiteHawk MONSTER 4X4 is ready to use- however you must follow these steps carefully:
Tip: Turn on the transmitter before turning on the truck - the LED power indicator light will flash rapidly, this means that it is searching for a signal to bind to. When you see this rapid blinking begin to slow down, it is an indicator that means that you should replace the batteries in the transmitter, as they are wearing down. |

|
Section 5 LiteHawk MONSTER 4X4 Wheel Removal The procedure for removing the Wheels from the MONSTER 4X4 is the same for the Front and the Rear. Using a Philips screwdriver, remove the large Wheel lock screw and the Lock washer from the Wheel and Axle. Pull the Wheel off of the Wheel Hub, and Axle.
You will notice that the Wheel has a removable Wheel Hex Nut that mates with the Wheel Axle that has the same cross impressions molded to it so that they fit perfectly together, and when attached with the Wheel Lock Screw and Lock washer, combined, they hold the Wheels on, and turning, through any,and all terrain. Just make sure that they are properly mated before tightening down. |


|
Section 6 LiteHawk MONSTER 4X4 Shock Removal Front and Rear Shock Removal is the same procedure. Remove the Screws from the Shock tower and the Lower Suspension Arm and the Shock is free.
Take note, that you can make ride height adjustments by attaching the Shock to different locations on the Lower Suspension. There are 4 locations on the Lower Rear Suspension Arms, and 3 locations on the Front. |


|
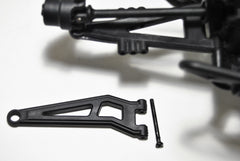
Section 7 LiteHawk MONSTER 4X4 :Rear Upper Suspension Arm, Wheel Hub, and Lower Suspension Arm Removal With the above described procedures for Wheel and shock removal already complete. With the tip of your screw driver or a nail will do, press out the Upper Suspension Arm Hinge Pin a couple of mm.
Then pull out the rest of the way with a pair of needle nose pliers.
Now remove the arm from the ball socket on the Wheel Hub.
One end of the Hinge Pin has a knurled end, this keeps it in place in the plastic. When reassembling, make sure that the knurled end is the last part of the hinge pin that you push in and not the first. You can now remove the Dog Bone. To remove the Wheel Hub, press the Wheel Hub Hinge Pin out with your screw driver or a small nail will do, until you can grab it with your needle nose pliers, and pull it the rest of the way out.
The Wheel Hub contains two wheel bearings and the wheel axle. I used two sockets, a 14mm socket to tap out the wheel axle.. just a light tap should remove it from the bearings.
We used a 9mm socket to firmly, but carefully, tap the bearings back into the wheel hub.
With the Wheel hub off, you now have to remove the rear bumper/skid plate to access the Lower Suspension Arm Hinge Pin. Remove these two screws, and set the plate aside.
With the Skid plate off you can now use your needle nose pliers and pull the hinge pin out.
Reassemble in reverse order. |


|
Section 8 LiteHawk MONSTER 4X4 :Front Upper Suspension Arm, Wheel Hubs, and Lower Suspension Arm Removal. Wheels and Shocks removed, as described above. The Front Upper Suspension Arm has two points that need to be dealt with.
Start by removing the Upper Suspension Hinge Pin screw, and lifting the arm away from the chassis.
Now you can easily twist the arm off of the wheel hub ball socket.
To remove the Front Lower Suspension Arm, you must first remove the Bumper/Skid plate. One screw from right in front of the front gear box, and two screws from the bottom, skid plate part. Pull off and set aside.
You can now access the Front Hinge Pins. Use your needle nose pliers to pull the Hinge pin out.
With the Lower suspension arm free of the chassis, you can now twist it free of the Wheel Hub Ball Joint.
To Remove the Front Wheel Hub, there are three points to address. The Upper and the Lower Arm Ball Joints, and the Steering Link connection, use needle nose pliers and twist each one off carefully.. leave the steering link until last, and you won't need the pliers, you can just twist it off. Now you can remove the Wheel Hub/ Dog Bone/Drive shaft assembly.
Just a light tap... you can almost push it out with you thumb.. and the Dog bone/ wheel Axle will slip right out, and you can remove the bearings if you need to.
When reinstalling the Wheel Axle and bearings, I used a 9mm socket to evenly press the bearing back into the Wheel hub and onto the axle.
Carefully Reassemble in reverse order. Take Note... The Front Wheel Hubs Looks like they can swap, left to right, or right to left. They can not !!! You have to look close, but they are significantly different. The rear Wheel hubs can swap. |


|
Section 9 LiteHawk MONSTER 4X4 : Removal of the Front Gear Box Cover, Differential, Upper Chassis Plate with ESC, Start switch, Servo, Center Dog Bone/Drive Shaft, Spur Gear, and Steering Arm Links. To get to these Front end parts, you must have followed the previous instructions for removing the rear differential. You don't have to.. but I have removed all the Wheels and wheel hubs for easier access. First, remove the six screws from the Upper Chassis.
Now remove the Servo Horn from the Servo, and remove the four screws holding the servo in place.
Now remove the two screws holding the start switch in place.
It would now be a good idea to take a good look at the lay out of the ESC and all the wires around it, how they are neatly arranged and tied up with little zip ties. Cut the zip ties away, carefully.
Where the red wire to the start switch is tucked in.. place a flat screw driver in the gap above the wires, and give a little twist, holding the gap open, long enough to pull out the wire. Now you can lift out the motor, the ESC with the Upper chassis, the Servo, and the Start switch and remove them from the Chassis.
Now you can remove the six screws from the Front Gear Box Cover, lift it off and out of the way.
Now you can lift out the Front Differential, or the Center Dog Bone/Drive Shaft, with the Spur Gear. The Spur Gear just slides on and off of the Dog Bone.
To remove the Steering Arms, you first remove the Servo horn and link from the Servo steering arm, then remove the two Steering links from the Steering Arms.
Now you can pull the Servo Arm and Servo Saver straight up off of the post it is on. Remove the two Ball sockets from the Steering arms and they will separate into pieces that you can remove from the chassis.
Carefully reassemble in reverse order. |


|
Section 10 LiteHawk MONSTER 4X4 :Removal of the Pinion/Spur Gear Cover. Removal of the Motor. Removal of the Rear Gear Box Cover. Removal of the Rear Differential. The Removal of the Pinion/Spur Gear Cover is important, just for maintenance. Lots of debris will pile up in here if it is fine sand or dirt that you are playing in. Just remove these three screws and lift the cover off. You can inspect the Spur, and Pinion Gear from here, and dump out any debris... a little air here is always good.
If you need access to the Gear Box ( Differential ) you first have to remove the Motor and Motor Guard. Remove these four screws, from the motor guard and lift out.
If you are replacing the motor, then first loosen the set key in the Pinion Gear... it is easier to do now than later.
Then remove these two screws from the Motor Guard, and the motor is free.
To remove the Gear Box Cover, you must remove two screws from here..
and two screws from here.
Carefully lift off the cover while holding down the center Dog Bone, this will give you access to the Rear Differential.
|


