AERO FAQ
| Welcome to FAQ for LiteHawk AERO |

|
|
LiteHawk AERO Specs: Controller: |
|
LiteHawk AERO Instruction Manual
|


|
|
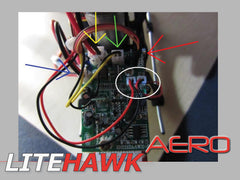
LiteHawk AERO ESC Guide Here is a legend to help decipher the ESC. Going clock wise from the left. 1 .Indicated by the blue arrow, the ON/OFF power switch 2. Indicated by the yellow arrow, the main engine 3. Indicated by the green arrow, the tail engine 4. Indicated by the red arrow, the servo that controls the angle of attack for the main rotor 5. Circled in white the LED's the one on the right, is for the nose LED, and the one on the left is for the tail LED |

|
|
LiteHawk AERO Body Mount Replacement If you happened to have had a crash, and you broke the canopy clips, well here's how to replace em..After unscrewing the small screw on the chin of the canopy, pop off the canopy on any remaining clip. Find the replacement in the bag of parts, or order more if needed. Screw the new clip back onto the frame, and you are good to go! |


|
|
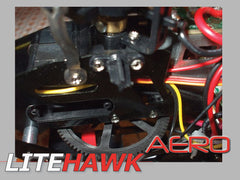
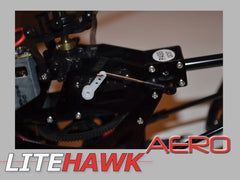
LiteHawk AERO Servo Ball Linkage / Pin Removal and Replacement REMOVAL PROCEDURE 1. Gently pry off / unclip Canopy from the Canopy Posts. Complete removal of the Canopy is not required but may allow for easier access and handling. To complete Canopy removal loosen remove the retaining screw under the chin of the Canopy. See Figures 1 and 2. 2. Gently pry apart Servo Ball Linkage from Swashplate Ball and work the pin out of the Servo Horn. See Figure 3. 3. In the event you have to unthread the ball joint from the Pin, it takes 10-11 full turns to re seat the ball joint into place correctly. See Figure 4. INSTALLATION PROCEDURE 1. Work the Pin back into position on the Servo Horn. The middle hole is ideal. 2. Gently replace the ball linkage onto the Servo Horn and Swashplate ball. Restore to as shown in Figure 2. 3. Gently reinstall the Canopy by replacing the screw and / or clipping it back on to the Canopy Posts. |


|
|
LiteHawk AERO Replacing the Main Gear - Start by removing the canopy.Then remove the 6 screws that secure the the outer chassis (five indicated in red , the sixth is indicated in green because it is hidden under the tie wrap and wires). - Remove the three silver spacers(indicated by blue arrows) so they don't fall off, and get lost, and remove the main gear screw (indicated by the red arrow) - Slide the main gear down, and off of the main shaft, if you are having trouble (because of the chassis on the other side) just grab your heli by the gear , and the upper rotor mount(indicated by yellow arrows), and gently pull upwards(following the direction of the blue arrows) it will slide up a few millimeters, and allow the main gear out. - To replace the gear, make sure the main gear screw hole is on the bottom (that you have the gear right side up) lift the shaft a little, and slide the gear in, line the holes on the gear, up with the holes on the shaft, take the longest screw, and put it back in, and reverse the steps of this tutorial to reassemble. |


|
|
LiteHawk AERO Swash Plate Swap Out - First remove the canopy. Next, remove the screw that secures the upper rotor assembly( indicated by a red arrow) and lift the rotor assembly off. - Next you'll need to unscrew the clear ball joint connector(indicated by a red arrow in pic 2), on the right side of your heli, and gently pop off the ball connector (indicated by a blue arrow in picture 2) - Now flip the heli over and to the same to the opposite side, you will also have to pop off the ball connector attched to the control horn. - Lift off the now loose, lower swash plate, when you replace it with the new one make sure to line it up correctly, there is one side without a ball joint, make sure it slides into the correct place (see the blue arrow in picture 4) - when replacing the clear ball joint connectors, make sure you put them back on correctly, there is a small tab on them that should be facing it toward the heli(there is a corresponding hole in the heli chassis)last picture. |


