IGNITER FAQ

LiteHawk IGNITER:

  • Fully Independent Suspension with Oil Filled Shocks and Tuned Springs gives you superior handling and control
  • Sealed Electronics box lets you take your IGNITER outside to explore all types of terrain.
  • Polycarbonate body shell
  • Precision Differential Bevel Gears
  • Double Wishbone Suspension
  • 2.4Ghz Digital Systems let you race with endless friends - without the worry of frequencies or channels!
  • Includes 1100mah 7.2V NiMH battery and charger.
  • LiteHawk IGNITER Instruction Manual English and French

    LiteHawk IGNITER - Parts View

    LiteHawk IGNITER - Charging 7.2V Battery

    1/ Plug your wall charger into a wall socket outlet
    2/ Connect the 7.2V battery into the wall charger as indicated. Do not force the connection - they only connect one way!
    3/ The indicator on the wall charger will go Red to indicate that the 7.2V battery is charging.
    4/ The indicator light on the wall charger will turn off when the battery is fully charged. (1.5 - 2 hours) Do not leave unattended.
    5/ Disconnect battery from charger after charge is complete.
    Notes:
    - You must fully charge your 7.2V battery before first use.
    - Do not leave 7.2V battery and charger unattended while charging.
    - The 7.2V battery and charger will get warm while charging. This is normal. Do not charge on, or near to, a material or surface that is flammable or one that can be damaged by heat.
    - The 7.2V battery can be re-charged many times before it needs replacing. When the 7.2V battery no longer holds a charge it should be properly recycled. DO NOT THROW IN HOUSEHOLD WASTE!
    - Your LiteHawk IGNITER will typically run for around 8 minutes on a fully charged 7.2V battery.

    LiteHawk IGNITER - Installing 7.2V Battery

    1/ Remove the body clips and lift off the body.
    2/ Remove the rear battery clip on the battery hold down. Removing just the rear allows the battery hold down to be lifted up and slid out.
    3/ Take your fully charged battery and place it in the battery slot with the connector and wires at the rear.
    4/ Ensure the battery wires and connector are facing away from the inside of the vehicle. Reattach battery hold down. Connect the battery to the other connector. (Don’t force it, they only go one way.)

    LiteHawk IGNITER - Transmitter & Receiver Binding

    - Your new IGNITER is ready to drive. There is no binding required.
    To sync:
    1/ Switch ON the transmitter.
    2/ Plug in the battery in the IGNITER.
    3/ Turn the switch ON. ON is facing the rear.

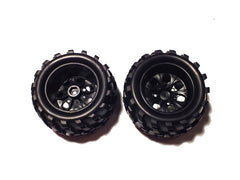
    LiteHawk IGNITER - Wheel / Tire Swap

    • Remove hex nut. 
    • Place new rubber wheel on new plastic rim. Use a small amount of model glue around the edge of the tire where it meets the rim . This will keep the rim from sliding inside the wheel. 
    • Remove the old wheel and tire. Replace with new one. Tighten hex nut.
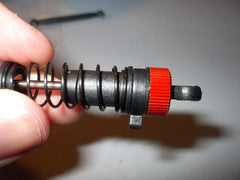
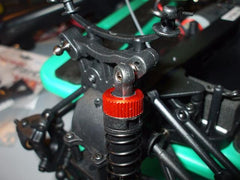
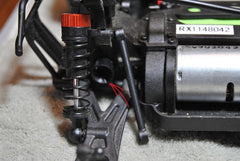
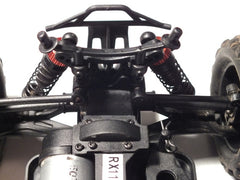
    LiteHawk IGNITER - Shock Pre Load
    • On the shocks of the Igniter you will see little rings right above the spring at the top of the shock. Also, in the bag that the manual is in, is included extra rings. These are called "shock preload clips". They control the ride height of your truck, as seen here. Having the clips installed, gives to more suspension travel, over rough terrain etc, and will lessen bottoming out.
    • This picture shows ride height with clips installed. 
    • This one shows with removed. To remove clips, pull small nub that is on the clip. 
    • To install, pull down the spring collar at the top of the spring. Snap on clip, and release the collar.
    LiteHawk IGNITER - Shock Replacement
    • To replace shocks, locate the two mounting points of the shocks. One upper, one lower. 
    • Pop the shocks off the mounting nubs. Reverse the procedure to re install, popping them back onto the mounting points. 
    • This works for both the front and the rear shocks.
    LiteHawk IGNITER - Front and Rear Bumper Replacement
    • Locate the two screws holding on the front and rear bumpers. 
    • Unscrew screws and side the bumper off. 
    • Reverse the procedure to re install.
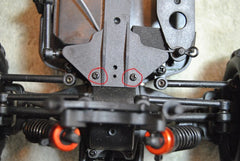
    LiteHawk IGNITER - Steering Knuckle, front and rear Dogbones, front and rear Differential Cups
    • Time to replace the front or rear Dogbones? 
    • After removing the wheels, first disconnect the steering link from the front steering knuckle. 
    • Next remove the 2 screws holding the steering knuckle in place. Remove the steering knuckle and the front dogbone will come right out.
    • Now remove the rear upper link from the rear wheel hub, and tilt the hub forward and therear dogbone will come right out.
    • If this is as far as you need to go...reassemble in reverse order and you are good to go. If you need to inspect or replace your Differential cup now is the time. 
    • One end of your dogbone fits into the steering knuckle or the rear wheel hub at the wheel, and the other end fits into the differential cup at the gear case. 
    • They just slide out..if you are putting new ones in, make sure that you lightly grease the inner part of the cup.
    LiteHawk IGNITER - Steering Assembly
    • First you need to remove the upper chassis and the gear box cover. 
    • Take out these seven screws, and set the cover and chassis aside. 
    • Now take the small screw that you removed from the gear box cover and put it into one of the open holes on the front gear box. 
    • This is to relieve a little stress on the gear box as you remove the steering assembly. 
    • Now remove the two steering links from the steering assembly and the servo link from the steering assembly.
    • Carefully lift off the assembly, making sure that you keep the steel steering pins in their posts. 
    • Now you need to remove the three ball heads from your old assembly and put them in the new. 
    • Reassemble in reverse order, being careful that you get the steel steering pins located in their correct posts on the upper chassis. 
    • Don't forget to take the small screw out and put it in it's proper place in the gear cover.
    LiteHawk IGNITER - Main Diff Gear, Assembled Diff, Centre Dog Bone, Pinion Gear , Spider Gears
    Remove Shocks and Upper Arm links from the shock tower on the front and rear of the vehicle.
    Remove screws from Gear Case on the front and rear. Remove upper chassis , Everything will now be exposed and visible.
    Do not lose steering pins when pulling this off, Make sure to reseat everything upon reassembly.
    To change centre dog bone or spider gears remove the screws from the end of the centre dog bone and slide gears off.
    Remove the exposed gear that needs to be changed.
    Remove Motor Use a hex key to loosen the pinion gear (if this needs to be replaced) and slide it off.
    Reverse steps for reassembly.