CRUSHER MT FAQ

|
|
LiteHawk CRUSHER MT Features:
|
|
LiteHawk CRUSHER MT Exploded Views: |


|
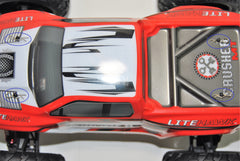
LiteHawk CRUSHER MT Body removal. Simply pull all four clips from the body mounts and lift off.
TIP: If you have fingers that are too big, like mine, and find it difficult to get a hold of the head of the clip.. take two sets of needle nose pliers and bent the head a little more than it already is.. it helps me! |
|
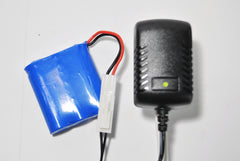
LiteHawk CRUSHER MT Battery Charge. Li-ion Battery Pack Blue Your New LiteHawk comes with a rechargeable 9.6 Volt battery. This battery powers the vehicle.
STEP 2: Connect the 9.6 Volt battery to the charger. The green LED light will turn to red.
STEP 3: When the LED indicator light on the charger turns back to green, the battery is fully charged.
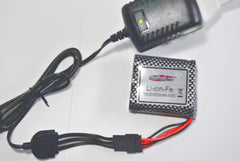
Charge times are (2-2.5 hrs.) do not leave on charge overnight. Battery should be unplugged from the charger after a maximum 8 hours. During charging: LiteHawk CRUSHER MT Battery Charge. Li-ion Battery Pack Black Your New LiteHawk comes with a rechargeable 9.6 Volt battery. This battery powers the vehicle.
STEP 2: Connect the 9.6 Volt battery to the charger. The green LED light will turn to red.
STEP 3: When the LED indicator light on the charger turns back to green, the battery is fully charged.
Charge times are (2-2.5 hrs.) do not leave on charge overnight. Battery should be unplugged from the charger after a maximum 8 hours. During charging: LiteHawk CRUSHER MT Battery Charge. NimH Battery Pack Never Mix NimH Battery Packs and NimH Battery Chargers with Li-ion Battery Packs and Li-ion Chargers. NimH systems cannot run with Lithium Batteries , and NimH Chargers cannot Safely Charge Lithium Batterys . Lithium systems cannot run with NimH Batteries and Lithium Chargers cannot Safely Charge NimH batteries. Your New LiteHawk comes with a rechargeable 7.2 Volt NimH battery. This battery powers the vehicle.
STEP 2: Connect the 7.2 Volt battery to the charger. The green LED light will turn to red.
STEP 3: When the LED indicator light on the charger turns back to green, the battery is fully charged.
Charge times are (3-3.5 hrs.) do not leave on charge overnight. Battery should be unplugged from the charger after a maximum 8 hours. During charging: |


|
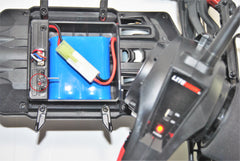
LiteHawk CRUSHER MT Battery Placement. The Battery Cradle is right in the middle of the Upper Chassis. With the Body off, open up all four 1/4 turn catches.
Then lift off the Battery Hatch.
Place the Battery in the Cradle.. and if you are going on a run, make sure that the start switch is off and plug in the battery. It will only plug in one way... don't force it.
Do the Next step.. Sync. the CRUSHER MT with the Radio. then button up the Battery Hatch.
Now you can put the Body back on and go Play! TIP: After your run.. let the Battery cool off for 10 minutes before recharging, charging a hot battery can seriously reduce the Batteries Life. Let the Motor cool off for 5 or ten minutes after a run as well, before you put a new Battery in for another run. |


|
LiteHawk CRUSHER MT Syncronization. With your Battery all hooked up and the switch off, turn on the Radio. The Red power light should start blinking on the Radio.
Now turn on the Switch at the Battery Cradle. A Red light will turn on just below the start switch, and the Red light on the Radio will stop Blinking and turn a solid Red.
The vehicle is now syncronized .. you can check by turning the steering to see if the wheels move. Now Button up the Battery Hatch!
Get your Body back on and go Play! |

|
LiteHawk CRUSHER MT Wheel Removal. The Front and the Rear Wheel removal is the same. LiteHawk has supplied a 5.5mm socket wrench to remove Wheels from your vehicle. Remove the Ny-loc Wheel nut with the supplied wrench.
Pull off the Wheel.
Be careful of the Hex nut underneath the Wheel. It just slides on and off, it holds the Axle pin in the Axle by enclosing it in a slot. If it slips off a bit on the Axle, the Axle pin may slip out.
|


|
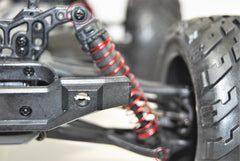
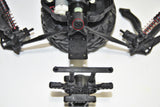
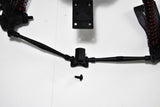
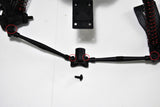
LiteHawk CRUSHER MT Shock Removal. Front and Rear Shock Removal is the same. Remove the screw from the Upper Shock at the Shock Tower, and remove the screw from the Lower Shock at the Lower Suspension Arm. Then lift the Shock out of the Lower Suspension Arm.
|

|
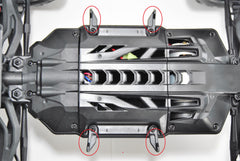
LiteHawk CRUSHER MT Lower Suspension Arm: Follow the above instructions to remove a Wheel and a Shock. These instructions cover all four Lower Arms.. they are all the same. Now remove the Lower Suspension Arm Hinge pin from the Chassis.
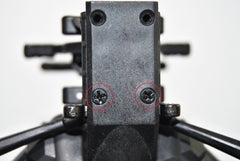
Remove the screw from underneath the suspension Arm holding it to the Wheel Hub.
Gently twist off the Lower Arm from the Ball socket on the Wheel Hub, and the Arm is off. To reattach the arm to the Wheel Hub, just snap it back on over the ball, don't press it on so much that it goes over the ball, it has to have freedom of movement on the ball.
Reassemble in reverse order. |


|
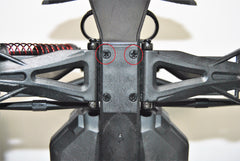
LiteHawk CRUSHER MT Upper Suspension Arm: Follow the above instructions for removing a Wheel and Shock. These instructions cover all four Upper Arms.. the are all the same. Now you have to remove the Front Bumper. Two screws from the front of the bumper and two screws from the Chassis bottom.
Set the bumper aside and remove the Bumper Reinforcement or Compression Spring, and set it aside as well.
Now you can remove the Upper Suspension Hinge Pin from the Chassis and remove the screw from the ball joint holding the Arm to the Wheel Hub.
Gently twist the Upper Arm off of the Ball socket on the Wheel Hub.
Carefully snap the Upper Arm on to the Ball not over the ball, and reverse the procedure to reassemble. |


|
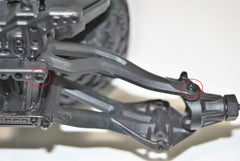
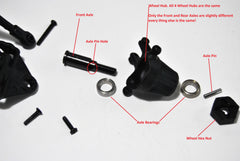
LiteHawk CRUSHER MT Wheel Hub: Follow the above instructions to remove a Wheel, pictures show the shock removed as well, this isn't necessary, it is just easier for pictures. These instructions cover all four Wheel Hubs.. they are all the same. With the Wheel out of the way, remove the screws holding the Upper and Lower Suspension Arms to the Wheel Hub, and twist them off the Ball Sockets. Also remove the screw holding the Suspension Link ( Rear ) or Suspension Steering Link ( Front ) ( They are both the same Link.. just attached to steering at the front and the Chassis at the Rear )
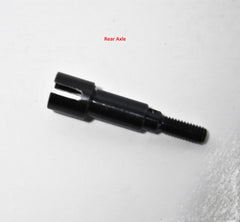
You can access the Parts of the Wheel hub at this point. All parts for the Wheel Hubs are the same, except for the Axles.. Front and Rear are different, but they are mounted to the Hubs the same.
Carefully reverse procedure to reassemble. |


|
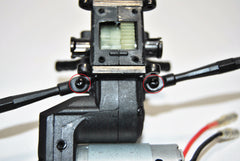
LiteHawk CRUSHER MT Servo Unit , Servo Horn and Steering Links: With the Front Wheels removed, follow above instructions to remove the Upper and Lower Suspension Arms from the Chassis only, and remove the screw holding the Upper shock to the Shock Tower, every thing can remain attached to the Wheel Hubs. Now remove the six screws holding the Servo, or Front Upper Chassis Cover, in place.
Remove the two remaining screws from the Lower Chassis.
The Front Bulkhead/Shock Tower Assembly will now come off, and you can set this aside. Remove the Screw holding the Servo Horn to the Servo, and gently pull off. If you only need to access the Steering links, you can now remove the screws from the Servo Horn and the Wheel Hubs and replace.
Now remove the Battery Hatch and unplug the Servo Wiring Harness from the ESC. and remove the two screws holding the Servo in place, and lift out.
Carefully reverse procedure to reinstall. |


|
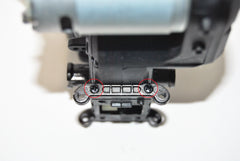
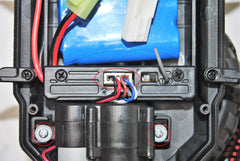
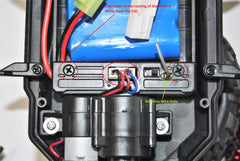
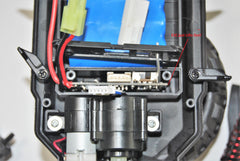
LiteHawk CRUSHER MT ESC: With the Battery Hatch removed, take note of how the wiring from the ESC is routed and the antenna wire hole before you remove it. Then remove the two screws from the ESC. storage hatch, and unplug the Servo Unit, and lift the hatch aside. The ESC. just lifts out.
|
|
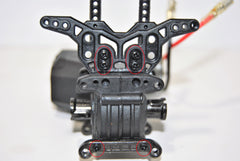
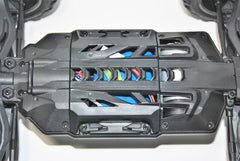
LiteHawk CRUSHER MT Gear Box and Motor: With the Rear Wheels removed, follow above instructions to remove the Upper and Lower Suspension Arms from the Chassis only, and remove the screw holding the Upper shock to the Shock Tower, every thing can remain attached to the Wheel Hubs. Now remove the six screws holding Rear Upper Cover or Motor Hatch, in place, and set aside.
Remove the Rear Bumper and set aside. ( Same as the Front Bumper ) Remove the remaining screws from the bottom of the Rear Chassis
Take note of the wiring route of the Motor wires before removing.
Unplug the Motor from the ESC. and lift out the Motor and Gear Box Assembly. You can now remove the Rear Tie Rods from the Wheel Hubs and Lower Chassis if you need to replace them.
Remove the Shock Tower Assembly from the Gear Box Housing, as well as the two Toe Blocks, from the front and rear of the Gear Box Housing.
Remove the three screws from the Motor Access Hatch, and carefully remove from the Gear Box Housing. Be careful of the Spur Gear Pin Bearing, just underneath the hatch, you don't want to lose that. Remove the two screws securing the Motor in place, and lift out. Just reverse the procedure to reinstall.
|