CIRCUIT FAQ
|
Welcome to our FAQ area for LiteHawk CIRCUIT Slot Car Sets |
 |
|
Still have a question? Please contact us service@litehawk.ca
|
|
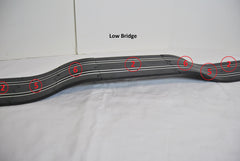
Double Lane Curved Track, Flat: This is a flat piece of track that curves 45 degrees and with 4 of them fit together it will make a curved turn of 180 degrees. Double Lane Strait track, Flat: This is a Flat piece of track, that adds length to a straight stretch. Double Lane Banked, Curved track: This is an inward curved track that initiates and ends a raised turn. It will lift the a section of Number 1 tracks that are together into a raised corner turn. Double Lane Crossover Track, Flat Track: This is another straight flat piece of track that adds length and implications, to the race. Double Lane Lower Bridge, Curved Down Track: This short piece of curved downward or concave in shape track, is the beginning or the end, of a raised bridge section. When it is coupled with the number 6 track which curves up, you will have the beginning of a low bridge. Another pair of numbers 5 and 6 and it will get higher, or turn the second pair of 5 and 6 around and a short bridge is complete. This piece is very similar to piece number 3, but shorter.
Double Lane Upper Bridge, Curved up track: This short piece of curved upward or convex in shape track, is the upper section of the bridge. It will connect to another 6 to make a low bridge or another 5 to make it higher. It could connect to a straight piece to extend a bridge and make it longer. Double Lane Digital Lap Counter: This piece of track adds length to the track, and provides the connections for power and control of the cars on the track, and keeps tabs of the laps run for you in a race. |


|
LiteHawk CIRCUIT - Fitting the Track Pieces together Putting the track sections together the first time, requires two strong hands, as they are a very tight fit. You want a tight fit so that the track doesn't wiggle and start to pull apart from the force and weight of the cars racing. Putting the pieces together the second time around, is much easier, but still a nice tight fit. _______________________________________________________________________ Each track piece has electrical connections for both lanes. One side is a female connection, and the other side is a male connection. The Male connection can be sharp. Always be aware of these sharp connections, as you pressure them together. Never push or pull anywhere near them - you don't want to bend or damage them in any way, or yourself.
Line up two pieces of track with the electrical connectors just started together.
Then push one side (one lane) as far in as you can with both hands. That will leave the other lane almost separated but not quite.
Now turn the two pieces of track around, and with two hands press the other lane together, very firmly.
This may have dislodged the other lane a little, if it has, turn it around, and with both hands firmly press it back together again.
The first time around you may have to work the pieces back and forth a few times until you are satisfied with the connection, and the little tab locks are all in place.
Tip: The Ramp section can be particularly tough the first time around. Using the above method will work. On the Curved sections, start with pressing on the outside of the curve first, then go to the inside. Its just a little bit easier. Joining the ramp to a curve, starting on the outside of the curve is really the only way to do it, the first time around. After you have done a couple.. the rest will go together easier. |


|
LiteHawk CIRCUIT - Track disassembly:
When you find that you have to take the track apart.. use a small flat head screw driver, and carefully insert it into the slight separation of the tracks at the locking tabs in the centre of the track.
give it an easy careful twist, that will move the two pieces apart.
If it doesn't come apart evenly.. move the screw driver over to the locking tab right beside it and carefully repeat.
Once separated a little, you can use your hands to complete pulling them apart. Tip: You will find that the track pieces will snap together much easier the second time around, and still maintain a solid fit. Tip: After taking apart and putting the track sections together a number of times, you may find a spot in your track that seems to be a lot slower than the rest of the track. If you remove that section of the track and turn it over, you will see that the metal electrical channel is held in with three small folded sections. After repeated setups and lots of playing. these flaps can start to loosen up. creating a bit of movement between the track and the electrical channel, making for poor connections at the track joins. As the car races over it, if there is any flex in the track or movement in the car, contact may be lost very briefly and it will seem as though the car slowed down. Take your flat edged screw driver and reflatten the folds back into place firmly. This will snug them back to the track surface and seem to give new life to your set.
Tip: If you have been racing on your track a lot. You might notice a general slow down that seems a mystery. Magnetization and Oxidation is happening on your electrical channels while you are driving mayhem about your track.. and over time it will affect the speed of your cars. Take a cue tip and clean your tracks electrical channels with isopropyl alcohol. Never use" scotch bright " on your track. Your track will love the demagnetizing and cleaning, and speed up for you if you do. If you should see the tips of your cars braids turning black.. it is an indication of magnetization and oxidation happening. |


|
LiteHawk CIRCUIT - Track Layout: When creating your track, especially for the first time, you should have a plan. Either, using one of the supplied track layouts, or creating your own. You can build your track, free style, but with every piece so tight, the first time around, it can be difficult adding a piece that is being stubborn to a whole track. With a plan in place, you will know how many curves, and the number of pieces in that curve. How many straight sections, and how many pieces in them. Where you wish to put your Start/Stop/Lap counter, where to place your track cross overs,if you have them. This way you can build sections of your track, that are much easier to handle, and then put the sections together later. TIP: You should build your track near a power source. A small extension cord may be your answer. Roughly lay out the Track: Once you have all your sections built, lay out all the pieces roughly where you want them, over the surface that you intend to build upon. You should never build a track on a carpeted surface, as it will build up a great deal of static electricity, that may damage the electronics in the set, or it may hurt you. A large table for the smaller BROOKLANDS set is perfect. The LAGUNA needs lots more space. Lots of floor space, or at least a 4 ft.X 8 ft. or more, sheet of plywood, mounted on a couple of saw horses would be good. If you happen to be installing crossovers into your track, you always have to put in even numbers of them. If you put in only one it will short the track, you have to put in two. Not three, it will short it out... Yes you got it four works fine.
Attach all your sections together, carefully.
|


|
LiteHawk CIRCUIT - Ramp Supports and Bridge Supports: These consist of a base that spacers or pillars, stack up on, adjusting in height with the number of spacers needed. A support bracket that fits under the track with a ball socket, that fits into the top of the spacer/pillar stack. To enable adjustment to whatever angle that you need.
Attach Guard Rails and Bridge Rails. The Guard Rails attach to each other with simple lock tabs.
The Guard and Bridge Rails, Attach to the outer edges of the Track. The Rails have a Lower Lip that fits on the bottom edge of the track. Then the Upper Lips/Tabs fold up with the rail over the top outer edge to secure the Rail to the Track The Bridge Rails are similar.
|


|
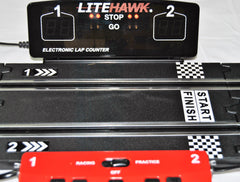
Attach The Digital Pistol Grip Controllers into the sides of the Lap Counter.
Now plug the Transformer into your power source, then plug the power cord into the Lap Counter.
Almost Ready! |


|
LiteHawk CIRCUIT - Set up The Digital Starter for Practice or Race: Tip: Don't change modes to quickly, this can create an error. If it does, turn the counter off, wait a moment then turn it back on. To set up Practice Mode: With power to the Digital Lap counter now on, you can either set it up for Practicing or Racing. Push the switch to the right from off to Practice, and the Stop/Go staging lights will flash a few times from Red to Green and then will remain Green. Power is now available to the Track, and you can practice as long as you like. No laps will be counted nor any laps put up on the Digital Display.
To Set up Race Mode: Turn the Digital counter off. Now push the switch to the Left, to Racing mode. The Digital Counter will set up with 00 laps in both lane counters with the Red Stop light on, and no power to the track. Push the Lap up/down arrows to set the number of Laps that you want to race in each Lane. You can set the Laps from 1 to 99 for either a sprint race or an endurance Race, and anything in between. You can even give your opponent a head start by setting more laps in your lane and less in there's.
A circuit protector is built into your lap counter to protect you LiteHawk Race Track. If a short circuit should happen, the power to the track will be shut off, and the red stop lights on the Lap counter will blink rapidly on and off.
Turn off the Lap counter. Check the track over for debris that may have caused the short.If the cars braided wire is twisted out of shape.. about 90 degrees, and it crosses the channel, it will short it out. That is usually what happens. The cars get spun around some times, sometimes even running backwards, they get so turned around.
When they do, stop the car immediately, check the braids, make sure that they are laying proper, and then place back on the track, or you may short the track. Once you have checked everything over, turn the track back on, and go back to playing. Make sure that your Race Car's Braided wire track connector is in good condition ( not all frayed and splayed out, but neat and pointing to the rear of the vehicle.
Set a car in each track. Set up the lanes with the number of Laps that you wish to race.When you are set... press the Reset/Go Button. and the Stop/Go Staging lights will flash from Red to Green a number of times, before remaining green. As the lights are staging, there is no power to the Lanes... as soon as the lights go solid green the power to the Lanes will come on, and you go... race!! As the Lights are staging you can hold the throttle down in anticipation of the green go light.. this is known a hard start, and you can try to get the jump on your opponent.
The Track counters will count down each lap completed until the lead car crosses the finish line. At this point the power to the Track is cut, the winning lanes lap counter will read 00 and will be flashing on and off, while the losing lane will show the number of laps uncompleted. A close race will show the distance left between the two cars.
To repeat the race, just tap the reset/go button once, and the Lap numbers from the previous race will reappear, and if you wish to adjust them, you can, if not, just press the reset/go button again and the staging lights will begin a new race. When you are finished for the day, don't forget to unplug the power cord and unplug the transformer. Tip: When it is time to store your CIRCUIT set away. Try to keep your styrofoam container to put every thing away in. A little tape over top of the pieces will help to keep them in place. |


|
LiteHawk CIRCUIT - Expansion: If you have the larger LiteHawk LUGUNA CIRCUIT set. You will be looking to build more. If you already have a track set up, and space is limited, you may be able to expand, even with a limited space. The pictures above are of a set made up on an area that is 7 ft. X 4 ft. and I found room to expand... a little.
I have some straight pieces left..hmmmm.. if I order a few....hmmmmm. |

