CHARGER 2 FAQ


Welcome to our FAQ area for LiteHawk CHARGER 2. Simple tips and tricks are just below - check our Overview video for even more info!

  
LiteHawk CHARGER 2 is a sleek, low profile, twin hull racing boat that follows the design look of classic Off-Shore Racing Crafts! The Motor, ESC and Receiver are all water cooled - protecting them from overheating! This is super important as everything is tightly sealed within the hull - hey, it gets hot in there! The twin-hull design of the CHARGER 2 lifts the boat out of the water at high speed - allowing it to ride on a cushion of air, increasing top speed right up to 25 km/h!

  • 2 Channel Fully Digital 2.4 Ghz Control puts you in the Captains Seat! Play together with up to 80 models at the same time without the fear of losing connection! 
  • Factory Assembled and Ready For You!
  • Water Resistant Top Cover uses a simple yet very strong twist tab - no need for complicated latch systems.
  • Boat Display Stand Included - perfect for showing off your new pride and joy!
  • Rechargeable NIMH Battery and Wall Mount Charger Included
  • Over-Sized Rudder let's you tackle the toughest turns with ease!
  • Water Cooling Intake is built into the Hull! So it will be both strong and durable!

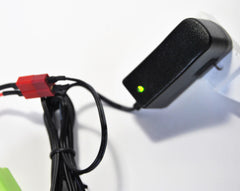
LiteHawk CHARGER 2 - NIMH Battery and Charger Instructions:

STEP 1: Remove the wall plug charger from the package and plug it into the wall. When plugged in a green LED light will come on.

STEP 2: Connect the NIMH battery to the charger. The green LED light will turn to red.

STEP 3: When the LED indicator light on the charger turns back to green, the battery is fully charged. Charge times are (approx. 2 hrs) do not leave on charge overnight. Battery should be unplugged from the charger after a maximum 3 hours

STEP 4: Unplug the battery from the charger and remove the charger from the wall plug.

During charging:
- It is normal for the battery to get warm during the charging process. Do not charge the battery on a surface that is flammable or can be damaged by heat.
- Do not leave the battery and charger unattended while charging.
- Do not store the battery plugged into the charger

(Li-Ion Version pre 2015)

LiteHawk CHARGER - Charging the 7.4V Li-Ion Battery
- The 7.4V battery and charger will get warm while charging. This is normal. Do not charge on, or near to, a material or surface that is flammable or one that can be damaged by heat.
- The 7.4V battery can be re-charged many times before it needs replacing. When the 7.4V battery no longer holds a charge it should be properly recycled. DO NOT THROW IN HOUSEHOLD WASTE!
- Your LiteHawk CHARGER will typically run for around 8 minutes on a fully charged 7.4V battery. As soon as you notice a drop off in speed you should bring the model back to shore or control may be lost.

LiteHawk CHARGER 2 - Installation of battery into the boat:
Place your LiteHawk CHARGER 2 on its supplied boat stand to avoid damage to the rudder and propeller. It is best to always have your boat on the provided stand when not in the water.
- Remove the hatch on the deck by turning the latch and lifting the cover up from the back.
- Insert the battery on the left or port side of the boat hull. You will see a Velcro strip on the hull. Match up the Velcro on the battery pack to hold it in place.

 
- Plug the Red battery plug into the matching plug in the boat. This is a tight fit, but the plug is keyed so it will only go in one way.
- Reinstall the top hatch.
- Do not store the battery plugged into the boat.

- There is a waterproof rubber gasket inserted into the lip where the hull joins the main upper deck. Always make sure it’s secured and in position before reinstalling the upper deck. 

- Remember to disconnect the battery and remove it after use. Always re-charge a Li-Ion battery if you intend to store the product for more than 24 hours. failure to do so will damage the battery.

LiteHawk CHARGER 2 - Binding the Receiver and Transmitter:
If for some reason your boat is not connected with your Transmitter make sure you are turning the Transmitter (Pistol Grip radio) on first and then plug the battery into the boat.

If this doesn’t solve the issue you will need to bind the Transmitter to the boat’s receiver.

- Switch on the Transmitter, making sure the indicator light is red.


- Plug in the battery into the boat


- Press down the BIND button on the boat’s receiver.
- The receiver’s green light will turn on to indicate that the binding has been successful.


- The boat should now accept inputs from the transmitter.
If you were unsuccessful in binding the boat to the Transmitter unplug the battery in the boat and turn off the radio. Then repeat the binding process.

LiteHawk CHARGER 2 - Changing Propeller
Not moving as fast? A damaged prop may be the answer. Lets see how to change it.
1/ Locate the nut at the back of the boat holding the propeller on.
2/ While holding the propeller use a pair of pliers to loosen the nut, or a 5.5mm box end or socket wrench. One comes with LiteHawk's Ground Vehicles for removing wheels.
3/ Once removed, slide the propeller off and replace it with the new one.
4/ Make sure to line the propeller up so it locks into place properly.
5/ Securely hold the propeller and tighten the nut back on.

LiteHawk CHARGER 2 - Water-cooled and water-proof electronics:
All LiteHawk Marine items are water-cooled! Your LiteHawk CHARGER 2 picks
up water from the base of the hull, as the boat is moving through the water. The water is forced through the the water-cooled motor mount. This helps to keep your motor cool. For added protection the Receiver and Electronic Speed Control (ESC) have been waterproofed. All this protection helps to avoid the classic problem that all R/C power boats have - how to keep everything cool.

- Before using your new boat carefully check the silicone cooling tubes are connected securely and not blocked,or kinked. Ensure that the water inlet at the base of the hull is not obstructed. A good way to check for blockages is to use your mouth to blow air into the outlet tube and make sure you have air exiting the inlet at the base of the hull.

- If you are running the boat in salt water, than you should blow out the cooling system as mentioned above after use. If possible run in fresh water for a minute or so to flush the lines.

LiteHawk CHARGER 2 - Flex Shaft Maintenance 

Your boat is virtually maintenance free, but one thing is vital to the life of the drivetrain. Lubricating the flex shaft keeps your boat running smooth and also acts as a water seal. This keeps water from entering your boat. Lubricate the flex shaft/propeller shaft after every 2-3 times you operate your boat. First, remove the Propeller from the Flex shaft.


The CHARGER has 2 Grub screws in the aluminum coupler that connects the motor to the flex shaft. Use the provided 2mm Allen Key to loosen the 2 Grub screws in the coupler. Grab the flex shaft at the propeller end, and pull back removing the shaft 3/4’s the way out of the boat. Lubricate the shaft with axle or bearing grease and re-install.


- Reinstall the shaft in reverse order.

Types of grease: Axle or bearing grease. Grease can be purchased at any auto parts supply retailer.

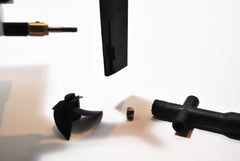
LiteHawk CHARGER 2 - Rudder Assembly

Remove the two screws holding the Rudder Assembly to the rear of the CHARGER.

With the assembly dangling free, you can manipulate the servo wire out of the.. remember this.. middle hole of the rudder linkage.


Carefully reassemble in reverse order.

LiteHawk CHARGER 2 - Servo/Rudder Linkage

Remove the two screws from the bracket holding down the servo, and unplug the servo wires from the ESC.

With the servo free of its restaining bracket, you can manipulate the servo from the servo wire.

Reassemble in reverse order.